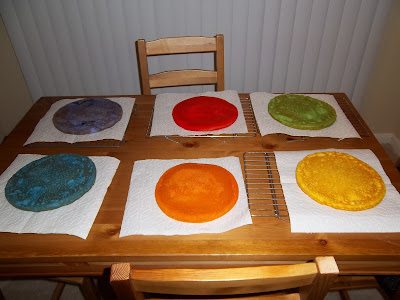
Before we moved, we had a little Fourth of July/ Moving/ Early Birthday party at our pool. The guys in the church loved my baking, so I decided that I had to go out with a bang and give them a really awesome cake. The cake also served as my birthday cake. Yes, I made my own cake :)
I found this cake on a blog a while back and I was planning on making it someday when I had kids. I could picture a rainbow colored birthday party and having my 'imaginary' son or daughter blowing out the candles to this cake. Well, I was too impatient and I decided to make it for myself.
Behold.... The RAINBOW LAYER CAKE!!
The whole point of this cake is that it looks really boring and normal on the outside, but once you cut into it.... TA DA... rainbow!! Originally I was going to make the cake from scratch using this recipe: Rainbow Cake, but with moving and everything I honestly didn't have time. So, I will show you how to make the shortened/copy cat version.
To make the cake:
1. You will need 2 White Cake boxed cake mixes. Prepare the cake mix according to the directions on the box. Divide the batter from the two boxes equally into six bowls.
2. Dye the batter.
Use food coloring (gel food coloring works the best) to dye the batter. You will need red, yellow, green blue and purple coloring (and orange). I mixed the red and yellow food coloring together to make my orange and it worked out well.


3. Pour the batter into the cake pans and bake. I only had 2 round cake pans that were the same size so I had to bake my cakes in batches of two, which took quite some time. If you have more cake pans, go ahead and prepare more!
4. Once the cakes are cooled, arrange your cake. Start with the purple layer on the bottom, and then layer blue, green, yellow, orange and finally red on top. Put a good portion of frosting in between each layer.

5. Crumb Coat.
Time to crumb coat your cake. Apply a very thin layer of frosting around the entire cake. It does not have to be a perfect icing job. This serves as a mold to hold the cake together and to prevent any colorful crumbs from getting into your final layer of icing. Once the cake is crumb coated, put it in the freezer for 15-30 minutes.

6. Frost the Cake.
Pull the cake out of the freezer and frost the cake. You can use any frosting recipe you would like. In the original recipe they used a lemon buttercream. I decided to just use a plain vanilla buttercream. But be warned, this cake uses A LOT of frosting. It look me 3 batches of frosting (12 cups of powdered sugar) to frost this cake! That also included my wonderful husband running to the grocery store at 1:00am to buy me more powdered sugar, so make sure you have plenty on hand!! Once you cake is frosted, store it in the refrigerator.

7. Add some Pizazz!
Since the cake looks really boring all white, go ahead and add a little detail. I bought some ribbon at Michael's and make a little bow for the outside of the cake. I taped a toothpick to the back of the bow so that it would stay on the cake easily.


8. Enjoy your guest's reactions!
It was so fun to see everyone's reaction to the cake. All of our friends were amazed at the inside of the cake!! I had so much fun baking this cake and I would easily do it again [perhaps when I have some kiddos!]


Hope you all enjoy and Taste the RAINBOW!


Beautiful! I believe I came up with Taste the Rainbow! Nice blog!
ReplyDelete